チュートリアル3番目のマーカーのカスタマイズを実装してみます。
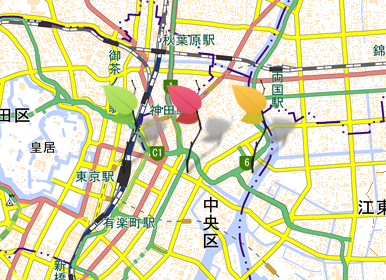
今回の完成形はこちら。
デモ
画像ファイルはimgディレクトリに格納している前提とします。
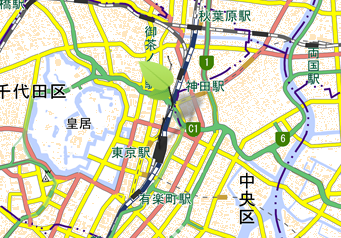
以下のようにアイコン情報を作成し、マーカー作成時に指定すればアイコンが表示されます。
var greenIcon = L.icon({
    iconUrl: 'img/leaf-green.png',
    shadowUrl: 'img/leaf-shadow.png',

    iconSize:     [38, 95], // size of the icon
    shadowSize:   [50, 64], // size of the shadow
    iconAnchor:   [22, 94], // point of the icon which will correspond to marker's location
    shadowAnchor: [4, 62],  // the same for the shadow
    popupAnchor:  [-3, -76] // point from which the popup should open relative to the iconAnchor
});

// マップ表示部分は省略

L.marker([35.681236, 139.767125], {icon: greenIcon}).addTo(mymap);

アイコン作成時のパラメーターは以下となります。
| iconUrl | アイコン画像パスを設定。 |
| shadowUrl | 影を利用する場合、画像パスを設定。必要な場合のみ設定。 |
| iconSize | アイコン画像サイズ。 |
| shadowSize | 影画像サイズ。必要な場合のみ設定。 |
| iconAnchor | アイコンのデフォルト座標からの相対座標。 |
| shadowAnchor | 影のデフォルト座標からの相対座標。必要な場合のみ設定。 |
| popupAnchor | ポップアップのデフォルト座標からの相対座標。必要な場合のみ設定。 |
同じ設定で複数のアイコンを表示したい場合、Iconクラスを継承したクラスを作成することで簡単に実装できます。
var LeafIcon = L.Icon.extend({
    options: {
        shadowUrl: 'img/leaf-shadow.png',
        iconSize: [38, 95], // size of the icon
        shadowSize: [50, 64], // size of the shadow
        iconAnchor: [22, 94], // point of the icon which will correspond to marker's location
        shadowAnchor: [4, 62],  // the same for the shadow
        popupAnchor: [-3, -76] // point from which the popup should open relative to the iconAnchor
    }
});

var greenIcon = new LeafIcon({iconUrl: 'img/leaf-green.png'}),
    redIcon = new LeafIcon({iconUrl: 'img/leaf-red.png'}),
    orangeIcon = new LeafIcon({iconUrl: 'img/leaf-orange.png'});
// マーカーを表示し、ポップアップも設定

// マップ表示部分は省略

var markerGreen = L.marker([35.681236, 139.767125], {icon: greenIcon}).addTo(mymap);
markerGreen.bindPopup("Hello world!
I am a green.");

// メソッドチェーンも使える
L.marker([35.681236, 139.778225], {icon: redIcon}).addTo(mymap).bindPopup("Hello world!
I am a red.");
L.marker([35.681236, 139.789325], {icon: orangeIcon}).addTo(mymap).bindPopup("Hello world!
I am a orange.");

以上でアイコン変更に関するサンプルの作成は完了です。
デモページのソースは以下となります。
デモ
目次
参考
Markers With Custom Icons
https://leafletjs.com/examples/custom-icons/


